Authentication Setup Guide
This guide covers how to configure authentication for kube-workspaces, using either an external OIDC provider or built-in local (username/password) accounts. The two methods can be enabled independently or together.
Overview
kube-workspaces supports two authentication methods:
-
OIDC (OpenID Connect) - federate to an external identity provider:
- Dex (bundled or external) - federated OIDC proxy supporting GitHub, GitLab, LDAP, SAML, and more
- Okta - enterprise identity provider
- Any OIDC-compliant provider - Google, Auth0, Keycloak, Azure AD, etc.
- Local auth - username/password accounts stored as Kubernetes Secrets, with no external dependency. A default admin user is created automatically the first time local auth is enabled.
Authentication is opt-in and disabled by default. When disabled, the system operates without auth (everyone has full access).
The manifests explicitly install AuthConfig/default with spec.enabled: false
for unauthenticated mode. A missing/unreadable configuration must not be used as
a way to disable authentication: the API returns 503 auth_unavailable if it
cannot resolve configuration. Authenticated overlays patch the same singleton.
Apply/adopt this manifest behavior before updating older auth-disabled installs
to an API with fail-closed configuration handling. Chart adoption is a separate
operator-coordinated change.
Authenticated users need a current, enabled User CR; OIDC auto-provisioning must succeed or the external identity must be explicitly bound to an existing account. Role and namespace changes apply to subsequent API requests rather than waiting for old token claims to expire. New credentials bind to the User UID; agent-backed execution requires these bound credentials and will require a fresh sign-in for legacy sessions.
Configure ALLOWED_ORIGINS (Helm api.allowedOrigins) with the exact trusted
frontend origins, including scheme/port. The API rejects untrusted WebSocket
origins and cookie-authenticated mutations without a trusted Origin. Native
bearer clients can omit Origin. Keep workspace-hosted applications on origins
that are not in this trusted browser list.
Architecture
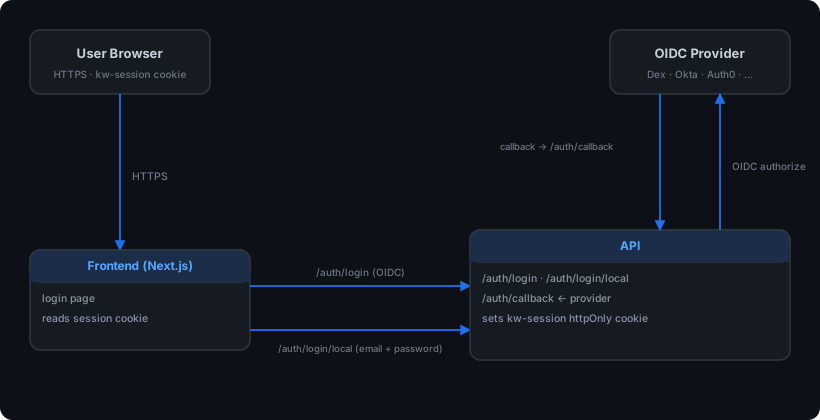
- Session tokens are HMAC-SHA256 signed JWTs stored in a
kw-sessionhttpOnly cookie - The signing key is stored in a Kubernetes Secret, and is used for sessions regardless of which authentication method issued them
- Local user passwords are bcrypt-hashed and stored in a per-user Kubernetes
Secret (
kw-user-<slug>-local-auth), referenced from theUserCR - User state is stored in
UserCRDs (cluster-scoped) - Configuration is stored in an
AuthConfigCRD (singleton nameddefault)
Prerequisites
- kube-workspaces deployed (controller, API, frontend)
- CRDs installed (
kubectl apply --server-side -k deploy/kustomize/crds/) - For OIDC: an OIDC provider configured with a client ID and secret, and the API reachable at a stable URL for the OIDC callback
- For local auth: nothing extra — see Option 5 below
Using local and OIDC login for the same account
Local passwords and OIDC bindings are independent methods on one User. Adding a method retains the User’s name, UID, personal namespace, workspaces and grants. OIDC identity is the exact issuer URL and subject, not an email address. An equal email, including a verified email, never silently adopts an existing account. An unbound identity whose email collides with an existing account is rejected and requires explicit linking.
An administrator can link their own existing account:
- Sign in to the account you want to retain, using its local password or an existing UID-bound administrator session. Change a temporary password first.
- Enable/configure the OIDC provider under Admin → Authentication, keeping local passwords enabled if you want both methods available.
- Open Admin → Users and select Link my OIDC identity.
- Authenticate to the configured OIDC provider in the same browser. Keep the initiating platform session until the callback completes.
- The Users page displays OIDC linked. Subsequent OIDC and local logins use the original account, even if the provider’s email later changes.
The linking transaction expires after five minutes and is single-use. The API rechecks the same administrator session and User UID at callback; demotion, disablement or account replacement prevents linking. It verifies the provider’s signature/JWKS, issuer, audience/authorized party, expiry and nonce and uses S256 PKCE. The separate adoption workflow below covers existing unbound OIDC-only accounts. Administrators can remove a binding using Unlink OIDC on its User row. Removal requires another usable, enabled login method, retains the identity reservation’s ownership, and revokes credentials derived from the removed binding. Relinking the same identity does not reactivate old sessions or device tokens. Unlinking your current session’s method requires signing in again through a remaining method.
Adopting an existing unbound OIDC-only account
An administrator can explicitly authorize adoption without giving the user a temporary local password or changing their role:
- Sign in with a UID-bound administrator session, completing any required password change first.
- Open Admin → Users and select Authorize OIDC adoption on the existing, enabled account with no local password or external identity binding.
- Share the generated invitation securely with that account’s owner. It is single-use and expires five minutes after authorization, including the time spent signing in to the provider. Merely opening its landing page does not consume it.
- The owner opens the invitation, selects Continue to identity provider, and signs in with the approved account email. The provider must supply that email as verified; a different or unverified email is rejected.
- After linking, sign in through ordinary SSO. Linking itself does not replace an existing browser session. Refresh the Users page to see OIDC linked.
Approval is bound to the exact existing User UID, email, provider and client. The API rechecks the approving administrator’s current session/authority and target account before starting and completing the provider round trip. Disabled, replaced, renamed-email, already-bound or newly local-enabled targets are rejected. Duplicate/case-variant account emails require operator resolution. Issuer/subject is learned only from the verified OIDC token, not from invitation input or an email-only login. Existing roles, grants, namespaces and workspaces are preserved. General delegated linking for local/dual-method accounts remains separate work.
The HTTP contract is POST /auth/oidc/adoptions with JSON
{"userName":"existing-user"} and header
X-KW-Link-Intent: adopt-legacy-identity, authenticated as the administrator.
It returns a relative adoptionURL, approved email and Unix expiresAt.
Use the returned invitation in the browser; do not manually edit User bindings.
Native-token and browser-session handoff codes also revalidate the current account and credential at redemption, not only when issued. A failed redemption consumes the code. They preserve the login method and credential revision, so a password reset or identity unlink also invalidates pending grants from that method.
Method-aware sessions, reset and upgrade behavior
Session and device credentials identify their login method (local or oidc),
User UID and credential revision. OIDC credentials also bind to an exact
issuer/subject and its durable reservation. API and proxy validate current
credential state on each new request without contacting the identity provider.
- Local password reset/change invalidates previously issued local sessions,
device tokens and pending handoff grants. A password change replaces the
caller’s local session; browser replacements stay in an HttpOnly cookie, and
Bearer-only callers receive the replacement
tokenin the JSON response. - Password changes made from an OIDC session preserve that OIDC session while invalidating the account’s old local credentials.
- A temporary local password restricts local sessions to identity inspection, password change and sign-out. Workspace/admin access, proxy requests and new device/browser grants are denied until the password has been changed. A valid OIDC session is not restricted solely because the account also has a temporary local password. The native client opens its password form before workspace access; CLI login refuses to persist a restricted credential.
- Unlinking rotates the retained reservation revision before removing the User binding. If persistence fails, existing credentials from that binding may be revoked even though removal failed; refresh account state before retrying. Other methods and the User UID/namespace remain intact.
-
/auth/configadvertises configured methods and enables native OIDC only when the provider is configured./auth/mereportsauthMethod,localPasswordEnabled,oidcLinked,canChangePasswordand the current session’smustChangePassword. Clients must use these account/session fields instead of treating an installation with OIDC as if every session used SSO.
Upgrade requires fresh sign-in: credentials issued before method provenance was introduced cannot be safely classified and are rejected, including old device tokens. Users and their workspace resources are retained; this is a credential transition, not account migration. Recreate any pending linking or adoption transaction after signing in again.
Coordinate API/proxy rollout and deploy the updated web/native clients. Both server components must enforce this contract before relying on method-specific revocation; old versions do not enforce these claims and may discard provenance when minting devices. Existing identity reservations need no destructive migration: an older reservation’s UID supplies its initial revision. New reservations and unlink operations use explicit random revisions. Hash/revision and temporary-password policy replacements are written atomically in the password Secret, with the User flag also able to tighten restrictions.
These checks apply to new requests and stream handshakes. Established WebSocket/stream termination is not yet guaranteed by the server; end the connection or restart the relevant component when immediate stream termination is required. Rolling back to older API/proxy code also rolls back these enforcement rules; do not describe a rollback as preserving revocation behavior.
Upgrade and migration ordering
Install the updated User CRD with server-side apply before deploying the API
that persists spec.externalIdentities. Helm upgrades do not automatically
upgrade files in the chart’s crds/ directory. Both the User binding and the
API’s atomic identity-claim Secret must exist; manually adding a User field alone
does not make an identity usable.
The read-only administrator endpoint GET /admin/auth-identities/inventory
reports duplicate/case-variant emails, legacy slug collisions, shared/missing/
orphan password Secrets, malformed/duplicate bindings and incomplete claims. It
returns names/references, never password hashes or plaintext passwords. Review
this inventory before adopting legacy identities; this release does not perform
automatic legacy-email migration. Existing OIDC-only accounts without bindings
can use the controlled adoption workflow above; an email match alone will no
longer log them in. Retain a usable local administrator for the transition.
Identity reservations bind to a User UID and survive account deletion. A failed second write leaves an inert reservation that the same account can resume; recreating a User or reusing its email does not transfer the reservation. Back up Users, authentication Secrets and signing keys together. Rolling back the API to an email-based version also rolls back the binding enforcement; retain the additive CRD fields and do not use that rollback as an identity migration.
Authentication state, identity claims, device registrations and local passwords
use kube-workspaces-system, including installations in another release
namespace. Ensure that namespace exists and adopt the chart’s authenticated
cross-namespace RBAC (auth.enabled: true) before using these flows. Enabling
authentication solely through the UI does not install missing chart RBAC.
Option 1: Bundled Dex (Helm)
The Helm chart includes Dex as an optional sub-chart. This is the simplest setup.
1. Create values file
# values-auth.yaml
auth:
  enabled: true
  oidc:
    issuerURL: "https://dex.workspaces.example.com"
    clientID: "kube-workspaces"
    clientSecret:
      create: true
      value: "a-strong-random-secret"
    scopes: ["openid", "email", "profile", "groups"]
  session:
    signingKey:
      create: true
      # Leave value empty for auto-generation, or set explicitly:
      # value: "my-32-char-signing-key-here!!!!"
  personalNamespaces:
    enabled: true
    template: ""
  registration:
    autoProvision: true
    defaultRole: "editor"
  adminEmails:
    - "[email protected]"

api:
  externalHost: "workspaces.example.com"

dex:
  enabled: true
  config:
    issuer: "https://dex.workspaces.example.com"
    storage:
      type: kubernetes
      config:
        inCluster: true
    web:
      http: 0.0.0.0:5556
    staticClients:
      - id: kube-workspaces
        name: "Kube Workspaces"
        secret: "a-strong-random-secret"
        redirectURIs:
          - "https://workspaces.example.com/auth/callback"
    connectors:
      - type: github
        id: github
        name: GitHub
        config:
          clientID: "$GITHUB_CLIENT_ID"
          clientSecret: "$GITHUB_CLIENT_SECRET"
          redirectURI: "https://dex.workspaces.example.com/callback"
          orgs:
            - name: your-org
  ingress:
    enabled: true
    className: nginx
    hosts:
      - host: dex.workspaces.example.com
        paths:
          - path: /
            pathType: Prefix
    tls:
      - secretName: dex-tls
        hosts:
          - dex.workspaces.example.com
2. Install
helm dependency update deploy/helm/kube-workspaces/
helm install kube-workspaces deploy/helm/kube-workspaces/ \
  --namespace kube-workspaces-system \
  --create-namespace \
  -f values-auth.yaml
3. Verify
# Check AuthConfig status
kubectl get authconfig default -o yaml

# Should show:
#   status:
#     enabled: true
#     issuerReachable: true
#     conditions:
#       - type: Ready
#         status: "True"
#         reason: IssuerVerified
Option 2: External Dex
If you already have Dex deployed separately, just configure the OIDC settings to point to it.
1. Create secrets
# Session signing key
kubectl create secret generic kube-workspaces-session \
  --namespace kube-workspaces-system \
  --from-literal=signing-key="$(openssl rand -base64 32)"

# OIDC client secret (must match what's configured in Dex)
kubectl create secret generic kube-workspaces-oidc \
  --namespace kube-workspaces-system \
  --from-literal=client-secret="your-dex-client-secret"
2. Create AuthConfig
apiVersion: kubeworkspaces.io/v1alpha1
kind: AuthConfig
metadata:
  name: default
spec:
  enabled: true
  oidc:
    issuerURL: "https://dex.your-cluster.example.com"
    clientID: "kube-workspaces"
    clientSecret:
      name: "kube-workspaces-oidc"
      key: "client-secret"
    scopes: ["openid", "email", "profile", "groups"]
    usernameClaim: "email"
    groupsClaim: "groups"
  session:
    signingKey:
      name: "kube-workspaces-session"
      key: "signing-key"
    tokenExpiry: "24h"
    refreshExpiry: "7d"
  personalNamespaces:
    enabled: true
    template: ""
  registration:
    autoProvision: true
    defaultRole: "editor"
  adminEmails:
    - "[email protected]"
kubectl apply --server-side -f authconfig.yaml
3. Configure Dex static client
In your external Dex configuration, add:
staticClients:
  - id: kube-workspaces
    name: "Kube Workspaces"
    secret: "your-dex-client-secret"
    redirectURIs:
      - "https://workspaces.example.com/auth/callback"
Option 3: Okta
1. Create Okta application
- In the Okta Admin Console, go to Applications > Create App Integration
- Select OIDC - OpenID Connect and Web Application
- Configure:
- App name: Kube Workspaces
-
Sign-in redirect URIs:
https://workspaces.example.com/auth/callback -
Sign-out redirect URIs:
https://workspaces.example.com - Assignments: Assign users/groups who should have access
- Note the Client ID and Client Secret
- Note your Okta domain (e.g.,
dev-12345.okta.com)
2. Create secrets
kubectl create secret generic kube-workspaces-session \
  --namespace kube-workspaces-system \
  --from-literal=signing-key="$(openssl rand -base64 32)"

kubectl create secret generic kube-workspaces-oidc \
  --namespace kube-workspaces-system \
  --from-literal=client-secret="<okta-client-secret>"
3. Create AuthConfig
apiVersion: kubeworkspaces.io/v1alpha1
kind: AuthConfig
metadata:
  name: default
spec:
  enabled: true
  oidc:
    issuerURL: "https://dev-12345.okta.com"
    clientID: "0oa1234567890abcdef"
    clientSecret:
      name: "kube-workspaces-oidc"
      key: "client-secret"
    scopes: ["openid", "email", "profile", "groups"]
    usernameClaim: "email"
    groupsClaim: "groups"
  session:
    signingKey:
      name: "kube-workspaces-session"
      key: "signing-key"
    tokenExpiry: "24h"
    refreshExpiry: "7d"
  personalNamespaces:
    enabled: true
    template: ""
  registration:
    autoProvision: true
    defaultRole: "editor"
    allowedDomains:
      - "yourcompany.com"
  adminEmails:
    - "[email protected]"
4. Okta groups claim
To use Okta groups, add a Groups claim to the authorization server:
- Go to Security > API > default
- Click the Claims tab
- Add a claim:
-
Name:
groups - Include in token type: ID Token, Always
- Value type: Groups
-
Filter: Matches regex
.*(or specify specific groups)
-
Name:
Option 4: Generic OIDC Provider
Any OIDC-compliant provider (Google, Auth0, Keycloak, Azure AD, etc.) can be used.
Requirements
Your OIDC provider must:
- Support the Authorization Code flow
- Expose a
/.well-known/openid-configurationendpoint at the issuer URL - Return an
emailclaim in the ID token (or configureusernameClaimaccordingly) - Support the configured
redirectURI(https://<your-host>/auth/callback)
Configuration
apiVersion: kubeworkspaces.io/v1alpha1
kind: AuthConfig
metadata:
  name: default
spec:
  enabled: true
  oidc:
    issuerURL: "<provider-issuer-url>"
    clientID: "<your-client-id>"
    clientSecret:
      name: "kube-workspaces-oidc"
      key: "client-secret"
    scopes: ["openid", "email", "profile"]
    usernameClaim: "email"      # Adjust if your provider uses a different claim
    groupsClaim: "groups"       # Adjust or remove if not available
  session:
    signingKey:
      name: "kube-workspaces-session"
      key: "signing-key"
  personalNamespaces:
    enabled: true
    template: ""
  registration:
    autoProvision: true
    defaultRole: "editor"
  adminEmails:
    - "[email protected]"
Provider-specific notes
| Provider | Issuer URL | Notes |
|---|---|---|
https://accounts.google.com |
Requires usernameClaim: "email", no native groups claim |
|
| Auth0 | https://your-tenant.auth0.com/ |
Trailing slash required; configure Rules for groups claim |
| Keycloak | https://keycloak.example.com/realms/your-realm |
Native groups support via realm roles/groups mapper |
| Azure AD | https://login.microsoftonline.com/<tenant-id>/v2.0 |
Use groupsClaim: "groups"; requires API permissions for group claims |
Option 5: Local Authentication
Local auth provides username/password login with no external identity provider. It is the fastest way to get authentication running, and can be enabled independently of OIDC, or alongside it (a user can have local auth, OIDC, or both configured for the same email).
Quick start (Kustomize)
kubectl apply --server-side -k deploy/kustomize/crds/
kubectl apply --server-side -k deploy/kustomize/overlays/auth-local/
This creates:
- An
AuthConfigwithspec.enabled: trueandspec.localAuth.enabled: true(no OIDC) - A session signing key Secret (
kube-workspaces-session) — required for all sessions regardless of auth method, so it must exist even for local-only setups
Within a few seconds, the controller auto-creates a default admin User
(admin@local by default) with a randomly generated password stored in a
Secret named kw-user-admin-at-local-local-auth in kube-workspaces-system.
Quick start (Helm)
helm install kube-workspaces helm/kube-workspaces/ \
  --namespace kube-workspaces-system --create-namespace \
  --set auth.enabled=true \
  --set auth.localAuth.enabled=true
Or via make:
make deploy-auth-local
Retrieving the bootstrap admin password
Session-signing and OIDC client Secrets created by Helm live in the release
namespace. The API and proxy resolve these references using POD_NAMESPACE
(supplied from their pod metadata), so a non-default Helm namespace does not
require copying those Secrets into kube-workspaces-system. When running either
service outside the supplied manifests, set POD_NAMESPACE to the namespace
containing its auth Secrets. Local-user password Secrets are a separate store
and currently remain in kube-workspaces-system.
make get-admin-password
# or directly:
kubectl get secret kw-user-admin-at-local-local-auth \
  -n kube-workspaces-system -o jsonpath='{.data.password}' | base64 -d
Log in with email admin@local (the default) and the retrieved password.
If you customized auth.localAuth.bootstrapAdmin.email, use that email instead.
By default, you will be prompted to change the password on first login.
The plaintext password key only exists until the admin changes their
password for the first time — after
that, only the bcrypt passwordHash key remains, and get-admin-password
will report an error.
Customizing the bootstrap admin
auth:
  enabled: true
  localAuth:
    enabled: true
    bootstrapAdmin:
      email: "[email protected]"   # defaults to admin@local
      skip: false                  # set true to skip auto-creation entirely
      mustChangePassword: true     # set false to keep the generated password on first login
mustChangePassword defaults to true in both the chart and AuthConfig CRD.
An explicit false lets a newly bootstrapped admin log in with the generated
password without a forced change. The setting applies only when creating the
bootstrap User (including re-creation after deletion); changing it does not
modify an existing User or rotate its password. The plaintext password remains
retrievable from the Secret until the user changes it. Password resets still
require a change on the next login.
Enabling local auth alongside OIDC
Add spec.localAuth to an AuthConfig that already has spec.oidc configured
(see deploy/kustomize/overlays/auth/authconfig.yaml for a commented example),
or with Helm:
helm upgrade kube-workspaces helm/kube-workspaces/ \
  --reuse-values \
  --set auth.oidc.issuerURL=https://dex.example.com \
  --set auth.localAuth.enabled=true
Both login methods appear on the login page; users can be created with either method independently.
Creating additional local users
Via the admin UI (/admin/users → New User → Auth method: Local password), or
via the API:
curl -X POST https://workspaces.example.com/admin/users \
  -H "Content-Type: application/json" \
  -b "kw-session=<admin-session-cookie>" \
  -d '{
    "email": "[email protected]",
    "displayName": "Jane Doe",
    "role": "viewer",
    "authMethod": "local"
  }'
Response includes a one-time password field (auto-generated if omitted from
the request). The user must change it on first login
(spec.localAuth.mustChangePassword: true).
Resetting a local user’s password
curl -X POST https://workspaces.example.com/admin/users/jane-doe-at-example-com/reset-password \
  -b "kw-session=<admin-session-cookie>"
Returns a new one-time password and sets mustChangePassword: true again.
Password policy and lockout
- Minimum password length: 12 characters (enforced server-side on change/reset)
- Passwords are bcrypt-hashed (cost 12) before being stored
- After 5 consecutive failed login attempts for a user, that account is
temporarily locked with exponential backoff (1m, 5m, 15m, then 30m), tracked
in
User.status.failedLoginAttempts/status.lockedUntil - The
/auth/login/localendpoint additionally applies a coarse per-IP rate limit, independent of per-user lockout
User Management
Creating users manually
Users are auto-created on first login when registration.autoProvision is true (OIDC), or via the admin API/UI (local auth — see Option 5). You can also pre-create OIDC users directly as a CR:
apiVersion: kubeworkspaces.io/v1alpha1
kind: User
metadata:
  name: jane-doe  # typically slugified email
spec:
  email: "[email protected]"
  displayName: "Jane Doe"
  role: editor
  namespaceAccess:
    - namespace: shared-team
      role: admin
kubectl apply -f user.yaml
Note: pre-creating a User this way does not give them local-auth password
login — that requires a password Secret and spec.localAuth, which the admin
API sets up for you (see Option 5).
Roles
| Role | Capabilities |
|---|---|
admin |
Full access to all workspaces in assigned namespaces; can manage users via admin API |
editor |
Create, edit, delete workspaces in assigned namespaces |
viewer |
Read-only access to workspaces in assigned namespaces |
A user’s authentication method (OIDC, local, or both) is independent of their
role — spec.role applies regardless of how they signed in.
Disabling a user
kubectl patch user jane-doe --type=merge -p '{"spec":{"disabled":true}}'
Disabling blocks both OIDC and local login for that user, and pauses reconciliation of their namespace/RBAC.
Granting shared namespace access
kubectl patch user jane-doe --type=json -p '[
  {"op": "add", "path": "/spec/namespaceAccess/-", "value": {"namespace": "team-alpha", "role": "editor"}}
]'
By default, new users (local or OIDC) have no namespace access beyond their personal namespace (if enabled) — namespace access must be granted explicitly.
Troubleshooting
AuthConfig shows IssuerUnreachable
kubectl get authconfig default -o jsonpath='{.status.conditions[0].message}'
Check that:
- The issuer URL is correct and accessible from within the cluster
- DNS resolution works from the controller pod
- TLS certificates are valid (the controller does NOT skip TLS verification)
Login redirects fail
Ensure:
-
AUTH_CALLBACK_URLenv var is set on the API deployment (orEXTERNAL_HOSTis configured) - The OIDC provider has
https://<your-host>/auth/callbackin its allowed redirect URIs - Ingress routes
/auth/*paths to the API service
Session cookie not sent
- The
kw-sessioncookie is httpOnly and Secure (requires HTTPS) - All frontend
fetch()calls must includecredentials: "include" - CORS must allow the frontend origin (check
ALLOWED_ORIGINSon the API)
User created but no namespace appears
- Check that
personalNamespaces.enabled: truein AuthConfig - Look at the User controller logs:
kubectl logs -l app.kubernetes.io/component=controller -n kube-workspaces-system - Verify the User CR status:
kubectl get user <name> -o yaml
Local login returns “account_locked”
The account has 5 or more consecutive failed login attempts. Check:
kubectl get user <name> -o jsonpath='{.status.failedLoginAttempts} {.status.lockedUntil}'
Wait for lockedUntil to pass, or clear it manually:
kubectl patch user <name> --subresource=status --type=merge \
  -p '{"status":{"failedLoginAttempts":0,"lockedUntil":null}}'
make get-admin-password reports an error
The plaintext password is removed from the Secret as soon as the admin changes
it for the first time — this is expected. If the admin has forgotten their
password, sign in through a bound OIDC identity or use another administrator to
select Admin → Users → Reset password. The equivalent administrator API is
POST /admin/users/{name}/reset-password.
Preserve the existing User. Deleting it invokes cleanup of its personal namespace and changes its UID; recreating the same name/email does not recover workspace ownership or external identity reservations.
If no administrator can sign in, a privileged Kubernetes operator can recover the existing local credential in place:
- Identify the exact
users.kubeworkspaces.ioobject, its UID and itsspec.localAuth.passwordSecretRef(name and hash key). Confirm local login is enabled in AuthConfig and on the intended administrator account. - Verify the referenced Secret in
kube-workspaces-systembelongs only to that account. Review other Users’ credential references first; do not reset a shared/colliding Secret as if it were uniquely owned. - Replace only the referenced bcrypt password hash with a hash for a new
password (bcrypt cost 12; password at least 12 characters). Remove any stale
plaintext
passwordentry. Use a local password prompt and pipe the patch through stdin; do not put the password in command arguments or committed manifests. - Set
spec.localAuth.mustChangePassword: trueon that same User. Clear any failed-login lockout in its status, as described above. Retain its role, namespace access, external identities, UID and personal namespace. - Sign in locally and change the temporary password. Recheck account access and keep a usable recovery administrator independent of the provider.
Changing the referenced password hash invalidates local-derived credentials on subsequent API/proxy requests, while preserving independent OIDC sessions. Registered device entries may remain listed, but their old local credentials are no longer usable. Resetting passwords must not require deleting a User or its namespace. Established connections require the stream handling described above.
Disabling an account and Kubernetes grants
The API and proxy reject disabled accounts on subsequent authenticated requests. The User controller also removes that account’s controller-managed personal and shared namespace RoleBindings and rechecks every 30 seconds while disabled. It retains the User, namespace, quotas, workspaces and desired access settings; reenabling restores managed grants from the current configuration. Operator-owned or other users’ RoleBindings are not removed. Established streams and separately managed Kubernetes access need their own revocation policy.
Password change returns HTTP 500 “failed to update password”
This error means the API’s ServiceAccount does not have write access to the
kube-workspaces-system namespace where password Secrets are stored.
Helm installs into a different release namespace (e.g. a shared namespace)
are the most common cause. The local-auth RBAC in the Helm chart creates a
Role/RoleBinding scoped to .Release.Namespace, but password Secrets
always live in kube-workspaces-system. Chart version 0.3.2+ adds the
cross-namespace Role automatically when auth.localAuth.enabled: true. If you
are on an older version, apply it manually:
kubectl apply --server-side -f - <<EOF
apiVersion: rbac.authorization.k8s.io/v1
kind: Role
metadata:
  name: kube-workspaces-local-auth-secrets
  namespace: kube-workspaces-system
rules:
  - apiGroups: [""]
    resources: ["secrets"]
    verbs: ["get", "list", "watch", "create", "update", "patch", "delete"]
---
apiVersion: rbac.authorization.k8s.io/v1
kind: RoleBinding
metadata:
  name: kube-workspaces-local-auth-secrets
  namespace: kube-workspaces-system
roleRef:
  apiGroup: rbac.authorization.k8s.io
  kind: Role
  name: kube-workspaces-local-auth-secrets
subjects:
  - kind: ServiceAccount
    name: kube-workspaces          # adjust to your release name
    namespace: <your-release-ns>   # the namespace you installed into
EOF
Verify access was granted:
kubectl auth can-i update secrets \
  --as=system:serviceaccount:<release-ns>:<sa-name> \
  -n kube-workspaces-system
# expected: yes
Kustomize base installs use kube-workspaces-system as both the release
and secrets namespace, so the bundled rbac.yaml already grants the necessary
access — no action required.